Exporting Cases to PowerPoint
You can automatically convert cases into PowerPoint presentations. A separate PowerPoint file is created so you can edit and save the file to a local hard drive.
You may export a case if you have write permissions on that case. To export a case:
- Visit the case you want to export, and click the PowerPoint link in the Case Options dropdown menu:
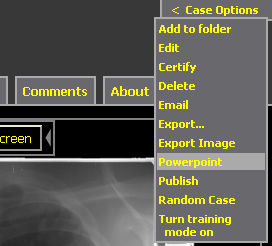
Note: if the PowerPoint link does not appear, you may not be logged in, or you may not have write privileges to the case.
- If there is a backing series present for one or more of the case images, you will see the Series Options dialog.
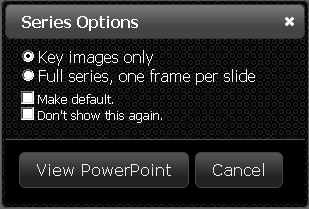
There are two options for case images with a backing series.
- Key images only
- Each case image gets exported, with one image per slide.
- Full series, one frame per slide
- In addition to the case image export, any images from backing series that are in the case will be exported as an appendix to the presentation.
Note that if a case image is taken from a series with a frame rate, the case image will be exported as an animation.
There are also options for setting default behavior of View PowerPoint.
- Make default
- Save this export selection as a preference, so that it will be selected by default the next time that you View PowerPoint.
- Don’t show this again.
- Do not present the Series Options dialog anymore. Your export preference will be automatically used when you View PowerPoint.
- It may take a minute or two for the PowerPoint file to be prepared. Once it has finished you will see a File Download pop-up allowing you to save the file to a local hard drive or open the file using Microsoft PowerPoint.
- The PowerPoint file looks as follows:

Export Multiple Cases into PowerPoint from a Folder
To export multiple cases at once, add them to a folder, and then export the contents of the folder:
- In the Case Manager, find the folder you you want to export. Right click on it and choose “More Options”.
- From the Folder Options page, click on “Export Folder” which appears under “Misc. Operations".
Note: if the Export Folder link does not appear, either you do not own the folder, or the folder contains no cases which are writable by your account.
- From the export form, select PowerPoint, specify whether or not to include backing series in export, and press the Export Cases button.
This will export all cases in the folder that are writable by your account. The process may take a long time if the folder contains many cases. Note: if the folder contains cases which are not writable by you, they will be skipped. Currently, our exporter is limited to creating one PowerPoint file per case. You can merge a PowerPoint manually by opening the separate files, switching to “slide sorter” view, and copying/pasting or dragging the slides from one file to another. It will create a zip file containing one PowerPoint for each case.
- Click on the link to download the zip file and launch the zip extraction software. This may take a long time if you are exporting a large number of cases.
Next: Importing Cases from a MIRC Source