You can export cases as standalone HTML which you can save to a disk for accessing when you are not connected to the intranet. For example, you can use this to save cases for presenting at a conference, or to study at home. You may only export cases which are writable by your account.
Exported case images will be packaged in a Zip file which enables you to download multiple files in a single operation. Most computers come with software for handling Zip files. Some systems may require utility software to be installed. If your computer does not recognize the file type (e.g. if it asks you to indicate which application to use), you should download and install Zip software or talk to your systems administrator.
You may export a case if you have write permissions on that case. To export a case:
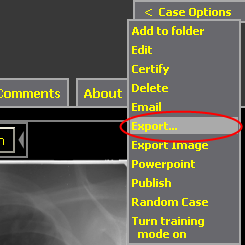
Note: if the Export link does not appear, you may not be logged in, or you may not have write privileges to the case.
Use the zip handler software to extract the contents of the zip file. For example, if you are using WinZip, click the Extract button.
Specify a destination on your hard drive to contain the exported case files and images. For example, you can choose your Desktop.
Be sure that the radio button indicates that all files should be extracted. Click the Extract button. The cases will be extracted to a folder in the location you specified. The new folder will have a name that starts with “zipDir…”
You can save this folder to any portable media, such as CD-R or USB drive.
This will launch Internet Explorer on the local HTML file, which is an index page with a link to the exported case.
Click on the case link to view your offline copy of the exported case.
The default view shows small images. You can view the images in their original size by clicking “as-submitted.”
To export multiple cases at once, add them to a folder, and then export the contents of the folder:
Note: if the Export Folder link does not appear, either you do not own the folder, or the folder contains no cases which are writable by your account.
This will export all cases in the folder that are writable by your account. The process may take a long time if the folder contains many cases. Note: if the folder contains cases which are not writable by you, they will be skipped.